Η ιστοσελίδα δεν υποστηρίζει το πρόγραμμα περιήγησής σας. Ενημερώστε το πρόγραμμα περιήγησης ή κάντε λήψη ενός άλλου προγράμματος


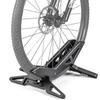
Bicycle stand that does not fall horizontal road mountain bicycle single bicycle does not fall road bike cycle tire width can be placed inside or
Τρέχουσα τιμή
Τιμή 89 €με ΦΠΑ
ΧρώμαΜαύρο

Αποστολή 11–31 εργάσιμες ημέρες

Παράδοση 4 €
Κανόνες επιστροφής
Ασφαλείς πληρωμές


Η υποστήριξη μιλάει Ελληνικά
Ασφάλεια και συμμόρφωση
Περιγραφή

Avocado House 078
3,6/56
Σχετικά προϊόντα


![BIGO Ποδήλατο Σταντ Πλευρικό Κεντρικό Μονό Πόδι Ρυθμιζόμενο Συμβατό με Βίδες και κλειδί περιλαμβάνονται [Εξειδικευμένο Κατάστημα] Σταντ, Σταντ, Σταντ, Μήκος, 22"](https://img.joomcdn.net/5e3b7582a3dea45e1a230839a8d518f253e7fddf_100_100.jpeg)


![Βάση Ποδηλάτου GORIX Ποδήλατο Δρόμου Γρήγορη Ελαφριά Κινητή Βάση που μπορεί να στερεωθεί στο quick [Ελαφριά Φορητή] GX-Q4M](https://img.joomcdn.net/c424ffdd4925b573177e6bf8b2b5e5ad5f23b1dc_100_100.jpeg)
